

Leather is an incredible durable and versatile material. With proper care it will generally last more than a lifetime, but you have to remember that leather is an organic material that was once a living working organ of an animal, and so it should be treated as such.
In this step-by-step guide we will go over every aspect of leather restoration giving this old tired couch a second lease on life.
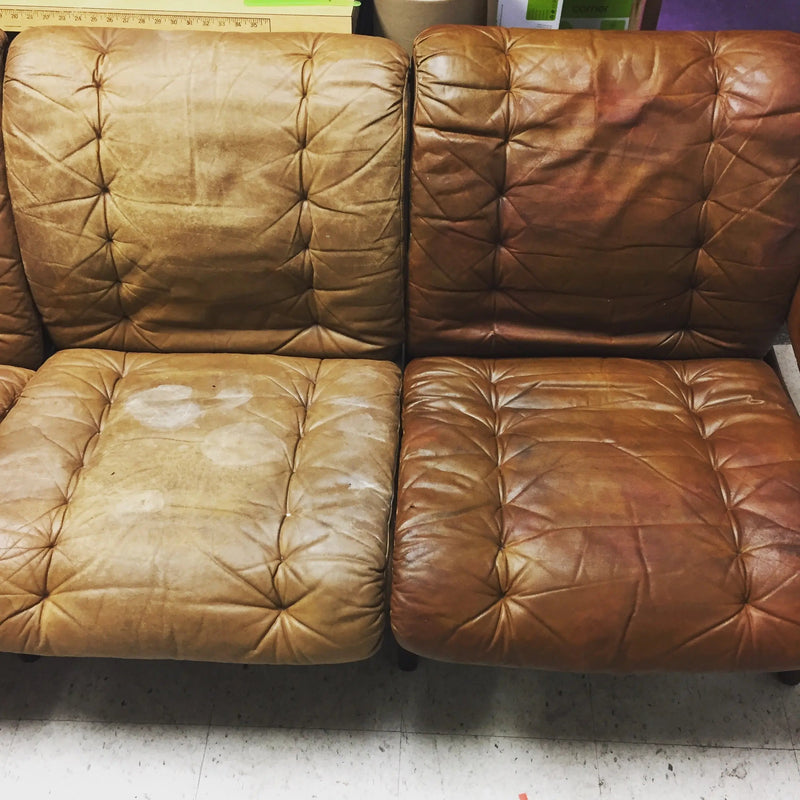
Before:
You can see the leather is dry, stained, and flaky or feathered in some of the high impact zones such as the armrests. There is also loss of colour on the wood legs and holes and tears that need fixing. Step-by-step, we will go over exaclty what we did to restore this couch as an example of what we can restore for you or to inspire you to repair your goods before deciding to toss them away.

Areas Needing Special Attention:


Step 1: Deglazing The Leather
A lot of leather goods, especially leather used for upholstery, will have a protective top coat meant to give the leather a sheen and for protection. This needs to be removed, along with any oils that have built up over time, before you should begin work on the leather.

There are deglazing products available from leather suppliers that will do this task nicely, or for a fraction of the cost and essentially the same effect, you can use any hardware store acetone. (Please note that nail polish remover will not work).
We also recommend good ventilation when using acetone or deglazer on your leather.
**We used three 118ml bottles of Deglazer on this 3 seat couch**
Removing The Top Coat:
 Dampen a soft cloth with the acetone or deglazer, gently rub the leather in a circular motion. Some of the dye in the leather will also be removed along with any tops coats and oils, making the leather easier to work with.
Step 2: Removing Stains From Leather

You may be surprised to know that the best way to rid leather of stains is with ingredients you might already have in your kitchen.

You will need lemon juice and cream of tartar. (which, by the way, can be added to baking soda to make baking powder in a pinch).
Mix the two ingredients into a paste with a similar consistancy to toothpaste, perhaps slightly runnier.
Try applying some of the paste to an inconspicuous part of the leather as a test to get your timing right. Generally you will want to leave the paste on the stain for 5-10 minutes, but if you leave it on too long, you may lighten the spot more than intended.

Apply the paste to the stained areas with an soft bristled toothbrush in gentle circular patterns to help the paste absorb into the stained area. After the appropriate amount of time, the paste should be dry enough to vacuum or brush off. Use a slightly damp cloth to remove any remaining stain remover.
Step 3: Conditioning The Leather
At this point your leather may be looking dry and dull. Before you re-dye your leather, you will want to condition it, this will give the leather the softness it needs to properly absord the dye and will help you get more even coverage.

Pure Neatsfoot Oil is great at softening and conditioning leather. Best applied with a natural horesehair bristle brush made for leatherwork, the oil will penetrate the leather quickly and you may want to consider a couple of applications.
Step 4: Re-dyeing
Now that the leather is void of stains, dirty oils, and protective finishes it can be redyed; again, we suggest good ventilation when doing so.
There are water based and oil based dyes. While water based dyes are more environmentally friendly, and have less airborne toxins to worry about during use, they tend to go on less even, take longer to dry and can sometimes harden the leather requiring further conditioning and moisturizing. Which ever kind of dye you choose is up to you, they both have their pros and cons.


Apply the dye with a soft cloth or sponge in circular motions. Give it several hours to dry and then reapply dye in any areas that look lighter than others. After several more hours, apply another general coat of dye.
**We used two 118ml bottles of oil based dye on this 3 seat couch**
Step 5: Finishing The Leather
Mink Oil:
Once the dye has been given 24 hours to dry since it's last application it is important to apply Mink Oil or another similar leather moisturizer which will soften, moisturize, and protect the leather against future moisture damage, drying, flaking, and cracking.
Please Note: Mink and other similar oils will darken most leathers by a couple of shades.

Mink oil should be applied in the same manner as the Neatsfoot Conditioning Oil.
Resolene:
Resolene is the type of coating we removed earlier in the deglazing process and you will likely want to reapply the product. Resolene is a low VOC water based acrylic liquid that goes on milky and dries to a clear, flexible, semi-gloss finish.
Apple resolene with a slightly dampened sponge in small circular motions, reapplying a second coat after letting the first dry for at least 12 hours or per the manufacturers instructions.
**We used one 118ml bottle of Resolene on this 3 seat couch**
Before and After:

Here you can see one cushion which has only been deglazed and the other which has been re-dyed and moisturized with mink oil before applying two coats of Resolene. You can see these processes make for a much richer and deeper looking leather.
Step 6: Repairing Holes
 You may find some small tears and holes in your leather couch which can be fixed easier than you may think. You will need a scrap of leather with a similar colour and weight. You can also dye your scrap in the same way you did your couch to acheive a close match.
 You are also going to need a leather glue. Leather glues look and act very much like common white glue, except they adhere especially well to leather and dry to a clear, flexible, rubber-like finish that can withstand the constant movement it will undergo during the leathers use.
 Insert the glued half inside the hole with at least 1cm (½ inch) making contact to insure a strong hold.

At this point you will want to a thick needle or some other narrow rigid object to tuck the other half of the leather into the hole and manipulate the top leather to close up the hole.
Place some light weight on the area just to make sure the glue bonds to all surfaces and let it sit for at least 12 hours. The glue will go clear when it is fully dry.
7: Other Repairs

There may be others area that have worn out due to repetitive contact over the years and it may be in areas that are impossible to fix becasue of an inability to get at the area you need to work on. In those cases, we recommend finding a comparable material and applying patches in a way that makes them appear like they were always where.

With some careful handstitching, an attractive repair was done that actually makes it superior to how it was manufactured. That corner will never wear out again.
8: Before & After
Wood Recoloured

Dry Flaking Leather Restored

Stains Removed

Leather Re-dyed & Moisturized


Before

After

Thank you for taking the time to read our blog!
****
Please do not hesitate to Contact Us should you have any questions for us or to discuss having a leather piece of your own brought back to life.

Marvelous job you did there, Thank you for the before and after photos!
Great article !
https://www.bostonleatherrepair.com/
Thank you great info!